Sunday, February 27, 2011

New Bright Pillows

Another part of our Living Room "Refresh" was to get new pillows.  Since we were looking at adding a bit of citron yellow to our green and cream room, I set out on a mission to add some citron to our pillows.

I stopped at JoAnn's to pick up some great fabric for new pillows.  I found a great citron and cream swirl pattern that would be perfect in the room.  The next step was to find batting.  Now batting is not an expensive material, but it's not cheap either, so I had a thought.  Making new pillows means that we would have to find a place to store our old pillows.  But what if we didn't have to move our old pillows?

The fabric that I had purchased was a thick upholstery fabric, thick enough that color would not bleed through or be seen through the fabric.  So why not just COVER the old pillows?  I purchased 1.5 yards of the fabric for $7.50 - on sale of course!  Then started looking for a pattern for a pillow cover.

I found a great pattern for a pocket cover, so that we wouldn't need any type of clasp, button, zipper and could be easily moved.  So here is the easy step by step!

1.  Measure your pillow.  Take a flexible tape measure and measure from seam to seam across the top of the pillow, so that it's more of a "circumference" measurement.  Be sure to measure it both directions.  Our pillows were 20" square. 


2.  Lay out pieces.  The front piece is the easiest.  You add one inch to your pillow dimension to allow for seaming the cover together - 1/2" on each side.  Because our pillows were 20" square, our front piece is 21"x21".  The back comes in two pieces, one slightly larger than the other to account for the flap.  You want them to overlap to look closed and finished in the back.  I wanted a 3" overlap.  Add 1" to each piece for seaming again.  The two pieces for the back panels were 21"x12" & 21"x13" (21"x11" would make it JUST meet in the center, because I wanted the overlap I added one inch to one piece and two to the other)


3.  I hemmed the exposed edges of the back panels - 1/2" hem (as you can see in the photo above).  Then I pinned the entire pillow together, remember to pin the fabric so that the right sides are facing each other.  You should be looking at the back of the fabric while you are sewing.  I pinned the cover together with the larger flap on the underside of the two flaps, so that it would end up on the outside when turned right side out.  Place the pins in about 2" so that you can sew without having to remove the pins.


4.  Turn the covers right side out and iron flat.


5.  Fill with your existing pillows.

We had enough fabric to make a small bolster pillow, and I had some left over batting in the basement from a past project,  just enough to fill the small pillow.  So for $7.50 and a little hard work, this was the finished product. 


They are so bright and cheery and will make a perfect addition to our final Living Room Refresh.  What do you think?  This project is easy enough for anyone to accomplish!

Magazine Holders

We have been busy this weekend getting a couple little projects done around the house.  If I must admit, I'm a bit of a magazine hoarder.  Not all magazines, just my Real Simple, Family Circle & Martha Stewart Living.  I have some older ones like the beloved and deceased Domino Magazine & a few Self's that I really liked.  I am prepared to box up and cut up a few that I really don't need anymore, but I love to have decorating ideas, design ideas & recipes at my fingertips.  For me, there is nothing like flipping through one of your favorite magazines to find them.

However, with lots of magazines comes magazine storage.... of which we do not have.  So I decided to invest in a quick little project.  I was able to pick up two plastic magazine holders.  They were clear, and I thought, what the heck, this could be a cute little project.  Why don't I spray paint them silver & use them on the shelves in the living room.

This is how we started:


We cleaned them out, and prepared them for spray painting.  We taped the back of each of the grids to keep the inside clear, but coat the outside.  We cut out construction paper and covered the flat surfaces.


The we used a metallic spray paint to coat the plastic.  We put two thin coats on everything.  While they are not perfect, they look pretty great for free!


I had to touch up the one on the right, as the finish was a little too matte, and they look perfect now.  We don't have a final resting place for them yet, but they will be part of the living room refresh.  Look for them in the final pictures!

Thursday, February 24, 2011

Our DIY Back Patio

In the summer we tend to spend a lot of time on our back patio.  The patio did not come with the house, it was a project that we undertook by ourselves a few summers ago.  While it was back-breaking work, it's a great amenity to our home & we love spending time there.  It's the perfect space to relax when it's hot outside, as half of it is in shade all day long.  It's also the perfect place to gather with friends around the fire pit in the cooler evenings, drinking beer and roasting marshmallows.

Here is how the project started.  We have a small deck outside of our back door.  Because the grade is three feet below first floor, they needed a transition, so they put up a very small deck.  Well this left a bit of a "corner" in the back yard that was perfect for a patio.  Because the yard is so small it didn't make sense to extend the deck, or the rest of the yard would seem very small.   So we settled on a stone paver patio.  I started doing research and decided to use concrete pavers on a porous bed so that it would drain.  I wanted something that felt very much like a private English Garden.  Something a bit rustic, and sheltered on most of the sides by plantings and lush greenery.

The patio is bound on three sides by things we couldn't or didn't want to move.  The house, the deck and two large honeysuckle bushes that are about 10 feet tall.  So, we measured the area that was available, and figured out the best sized patio for that area.  It worked out to be about 12'x14'.  We found a paver tile that we loved, that were about $5 a piece.  In total we spent about $550 on the pavers.  Now it was time for the hard, and I mean HARD work.

First we strung up cord exactly where we wanted to have the patio.  We put stakes in all 4 corners and used yellow cord to mark the boundaries of the hole.  Next we scored up the grass in that area, removing sod that was about 12"x24"x 4" deep.  We were able to give some of this sod to neighbors, some we used to fill in dead spots in our yard, and the rest went to the city as recycled yard waste.  Then we needed to dig out the rest of hole.  The hole was meant to be12'x14'x9", so we still had about 5" of dirt to remove... that's right, with shovels, we dug out about 126 cubic feet of dirt and grass.

This was what it looked like after removing the top layer of grass and dirt

Next we put in a base layer of recycled concrete.  It's eco-friendly, as it is recycled, it's a bit cheaper than gravel, but still gives the benefit of being a porous layer to drain the water.  It also has the added benefit of helping to prevent vegetation from growing up through the patio.  The 4 cubic yards of very heavy gravel was dumped onto the edge of our driveway.  We had to fill dozens and dozens of loads of concrete into a wheelbarrow and dump them into the hole.  After the hole was full of stone, we rented a tamper to tamp the concrete down, so that the layer became stable, and it made the surface almost walkable.  We were able to get the recycled concrete for free from a friend who works for a demolition company & we rented the tamper from home depot for about $45.

Pardon the shade line, but you can see how most of the area is in the shade!
Also, note the remainder of the gravel pile in the driveway.

The concrete layer was around 3-5" deep, depending on the area.  Our first goal was also to prevent ponding and leaking of water along the foundation & basement wall, so we wanted to slope the new patio away from the house.  So the recycled concrete tended to be thicker near the house and thinner as it moved away.  It turns out that we should have used a level.  While the water definitely stays away from the house now, we didn't slope enough at the end of the patio, and now the water tends to collect in the middle.  However, it drains rather quickly, so we don't mind.  It just leaves dirt deposits in the middle of the patio that need to be swept clean occasionally.

The next layer was about a 1-2 inch bed of paver sand.  We tried to tamp the sand, but quickly learned that the mission was impossible, so we raked the sand so that it was pretty much level the way we wanted it to be.  We bought a lot of paver sand.  The sand came in 30 pound bags and I would guess that we spent about $150 on the sand.

Next we started to lay the stones in rows.  The first row is the most difficult.  It establishes the angle of the patio in both directions.


So we started with the two sides that were most important, and worked our way out from there.  Laying these stones is NOT easy.  You put one down in the sand and make sure it's level.  When you put the next stone down, it needs to be level to the stone before it.  This is the most difficult part.  Most stones were not level when you put them down the first time, so you need to pick them back up, level out the sand, fill in if it's low, and replace the stone.  Each of these paver stones were set at least twice.  This was a very time consuming part of the process.  It is also hard to pick up a 20 pound paver with the tips of your fingers, but that's what you had to do, so that you wouldn't disturb the level sand.

By the time we got to the last two rows, we were spent.  The whole process had taken about 6 weeks at this point, and we were tired of setting stones... but we couldn't just leave it!  We had to get motivated and finish.  Of course we were doing this in June, to get ready for the 4th of July, so it was a bit warm.


We were almost there!  So we laid the last few stones and started to add paver sand in between the stones.  The stones that we purchased were stamped to look like 4 stones in each square, so we put paver sand into each crevice, including the stamped ones to give the appearance of multiple stones.  We would throw down the sand, and carefully push it into the cracks, then swept the surface with a broom at the end to fill in the gaps.

Now we had to deal with all of the rest of the dirt!  We had a lot of dirt that we had just piled up against the house while we were working.  We had dirt piled about 3 feet high along the house and cascading down toward the patio.  This dirt needed to be moved.  The photo below only shows about half of the dirt we were left with.


We were able to give some away, transfer some into planting beds and spread the rest out in another area of our yard, but it was finally gone.  We tilled up the surface dirt around the patio & added the furniture.  Hooray!  We were finally done.  Here is the final product.


The whole patio cost us about $750, way less than it would have cost someone to put it in.  I believe we had heard it would be about $3,000 to hire someone to put in this same patio.  Well worth the 6 weeks of work to do it ourselves!

Since this was several summers ago that we finished the patio, we have added larger beds around the patio and lots of new plants since then.  Moss has started to grow in the joints of the stones and around the back of the patio, which was exactly what I wanted to help it to feel more like an English garden.  Once summer comes around I'll be sure to update with a few current photos, but this is our project.  We are extra proud of it because we did it all by ourselves and it's perfect for us.

Monday, February 21, 2011

Warm Grey Walls

When we painted our guest bedroom, I had a simple dusty beige color in mind.  Turns out that what we ended up with was a little more yellow-brown & not exactly what we were looking for.  But because the purpose of the room was to house my husband's older, smaller bedroom set & to make a comfy place for our guests to sleep, browny-beige was what it was, and was on the walls to stay for a while.

The room has yellow curtains that were left by the previous owner.  Nothing flashy, but they work.  There are deep yellow linens with a simple white down comforter.  There are touches of blue in the room, an ice blue fleece at the foot of the bed, a cobalt blue lamp/ end table & blue in the tack board near the desk.  The blue, yellow and beige work well with our other colors upstairs.  However, recently, I have found the perfect color for this room.

Welcome to what I call "Muddy Grey" ---> 
Photo: Martha Stewart Living
While my name for it is nothing short of awful, the color is amazing.  It is warm, it is rich and it looks BEAUTIFUL with yellow.  So while we don't have the money to replace the linens in the room, they would look lovely with this color.  It still has yellow undertones, making it warm, but still 100% a neutral.


Photo: Decor Pad
In fact, when we do get new linens, at least curtains, I would probably go with an even bolder yellow color.  This color is relaxing, very modern, and elegant.  A mix of white and ivory go beautifully with the shade & absolutely everything put up against it will POP against the wall.  And if we've been able to stand the existing color for nearly 4 years, even if it turns out not to be the perfect color, it will be better than what we have, and will be there for a long time.

What would you name this color?  Do you think it works for a guest bedroom?

Spring is Near!

Just a touch of warm weather last week, and now I am craving spring, more so than I was before.  We were able to see some of the daffodils and tulips starting to peak up out of the ground, since the warmer weather finally melted the 2+ feet of snow in our yard.  The sun was warm and wonderful.  But alas, winter has returned with a vengeance, and the inch or more of ice that coated the world this morning was a wake up call that winter is NOT over yet.

So in order to forget about my car, now sitting outside in the ice and snow storm, I wanted to start thinking about spring.  About planting things outside!  Now I do plan on putting together a bit of a container garden this spring, but I also wanted to put together an arrangement of cool pots filled with annuals.  Ferns, ivy, flowers...  I want to arranged a few on the porch to give our house a little extra color, and warm up the porch a bit - so I started browsing for interesting ways to put together a cool arrangement of plantings.

1. Birch Bark:  You are able to buy this as a sheet good from some craft stores.

Available on Etsy HERE
This particular item is a metal urn wrapped in birch bark & I love it.  I think it would be easy to get some cheaper plastic or metal tins, of varying sizes and heights & wrap them in this amazing bark to give them a unified look.  I LOVE this look.  I liked it when I was looking at wedding planning, and I love it now.  You can even wrap up a couple citronella candles for the porch or patio as well so that they match and keep away the pesky mosquito's!

2. Chalk Pots:  Pick up Chalkboard paint at your local hardware store.

Avaliable on Etsy HERE
You can plant your favorite herbs or flowers in pots painted with chalkboard paint.  Write what's in the pot, or if by your front door, leave welcoming messages for your guests.  I think this is great for an herb garden.  Plant your favorite herbs and spices in matching colorful pots, paint on a swatch of chalkboard paint (as shown above) and write what each herb is!  Beware, if they aren't in a covered area, the chalk will wash off with a rainstorm!

3. Wall Paper or Contact Paper:  Pick up a roll of your favorite wall paper, craft paper or contact paper at your local craft store.
Available on Etsy HERE
Because weather would be hard on these, these great metal tins covered in your favorite wall covering or contact paper would be perfect for an indoor garden.  Place one in your kitchen window filled with your favorite spices, or put a couple great green plants in one and place it on your sideboard or in your front window.

4. Reclaimed Wood:  You can purchase reclaimed wood, or use your own to make these great boxes.

Available on Etsy HERE
This particular vessel uses old barn wood to create a great wood box.  Use this as a planter on your patio, or even as a great centerpiece.  You can use it to go around a plastic container, or put a bottom on it, and use it independently.  I think it's perfectly rustic & is a great way to upcycle some old wood from palettes, crates, sheds or barns!

So I plan on getting or making a couple of simple plant stands of varying heights, and arranging cool pots of greens & flowers for a great addition to our front porch and possibly back patio.  These ideas get my head going in the right direction - now I just have to decide which ones I like the best!  I think it might be a combo of the birch bark and reclaimed wood.  I think they work beautifully together & would be easy to put together.

Friday, February 18, 2011

CasaSugar's Weekend DIY

Here were are again.  Happy Friday to all.
Here is a little peak at what's included in this weekend's DIY from CasaSugar.

Photo & How-To: Link

1. Add piping to pillows
2. Ruffled Lamp Shade (shown above)
3. Sliding Bedroom Barn Door
4. Make a bookshelf into a coffee table
5. Open Shelving
6. String Globe Lanterns (Beautiful for weddings or parties)
7. Succulent Art

Check out all the photos & find links to all of the How-To's at Casa's Website.
Follow this link, it will lead you right to it!  Weekend DIY

Thursday, February 17, 2011

It Pulls the Whole Room Together

In case you didn't catch the very slight movie reference in that subject line, it is in reference to The Big Lebowski.  And in the movie, when he is talking about that subject, he is referring to his favorite rug.
But "The Dude" was right...Rugs are something that can literally pull a room together.  They can add color, pattern and texture.  They can tie an obscure color into your rooms' palette.  They can soften a room, or accentuate specific design ideas.  But the main thing is that they can give the room a little personality.
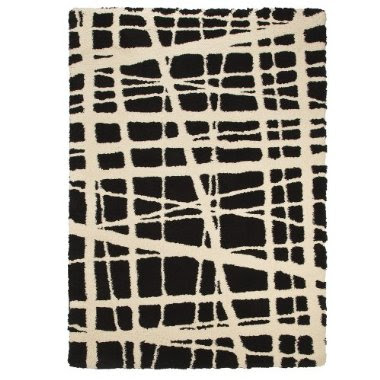
Blotting Carolina Rug - Target

We, at our home, are unfortunately covered in carpeting, for now... but if you know anything about me yet,  I am sucker for a bold, graphic pattern, in a fairly neutral color palette.  And when we do bring out the hardwood floors, the great rugs will not be far behind.  Unfortunately, rugs can be VERY expensive - especially when  you are looking at large area rugs - but there are a few places that you can go to get great discounts.

Coinciding Circles Rug - Target
 Marshalls & TJMaxx, if the stores are large enough, will carry area rugs.  They are usually fairly discounted, and they have great basic patterns.  Garden Ridge, if you are lucky enough to have one near you, has a great selection on modestly priced area rugs.  And one store in particular that has great deals, and should not come as a surprise to anyone, is Target.  They were the source for all of the examples from my post today.

Design Rugs Collection - Target
Depending on which room you are in & the size and layout of your room, you will need different sized rugs to accommodate your need.  You can look for accent rugs, which are usually 5'x7' and smaller or area rugs, which are much larger.

Home Circles Rug - Target

For our living room, we could do a small 5'x7' rug that sits in front of the couch, or a large 8'x10' rug that engages the furniture.  I tend to think that the larger rugs do a better job of pulling a room together.  Engaging the furniture helps to make it feel like one space.  It doesn't have to cover the entire floor, it just needs to slide a few inches under each piece of furniture to connect it all visually.

Using a similar concept, you can separate one large room, into two seperate spaces by using area rugs.  For example,  if you have a large Living Room that you would like to make into a Living / Dining room combination, you could use a bold graphic rug to engage the living room furniture.  You can leave the dining room without a rug, or add a simpler rug under the dining room furniture to make it feel like a different space.  The example below is from the website younghouselove.com.  You can see that the bold rug in the Living Room space makes it feel very seperate from the Dining Room space.


Photo younghouselove: Link
 One good thing about rugs - they aren't permanent.  You can return them if they don't quite work or you can move them to another room just to change things up.  They are as much of an accessory as a wall hanging or end table.  I plan on having fun with this accessory as soon as the carpet is gone from our floors.

Do you have any other favorite places to get rugs at an affordable price?  Please feel free to share!