I've said it before & I'll say it again - it's time to get back to work on our house. Winter is over, and the lists have begun. A few things have gotten accomplished, and a few previous plans will be back underway. This winter, we added an extra shelf in our coat closet, we got a new dishwasher, a "new" shelving unit in our hallway & more. I'll upload photos soon with details.
I decided to start with a fresh look for the blog for 2012 & hopefully a fresh outlook on our home - making it wonderful and comfortable for us.
All starts with a trip to IKEA, and we'll go from there. Our projects will begin this spring, with a makeover on the second floor of our home. It's time to find another way to store our clothes so that we can make room for an extra bedroom. Our third bedroom has been our closet for nearly 5 years now, and eventually, we'll want to think about having another resident in our home - and we will be needing that bedroom! Not anytime soon, but we might as well get started with the projects! We have clothes to move, carpet to remove, walls to paint, and so much more. And the funny thing is, I'm really really looking forward to it!
This summer we will work on the outside of our house, and get some much needed window repairs, and continue to make the inside something we love.
I'll be sure to check in and start updating again soon - this time I really do promise. I'll bring the camera with me to IKEA, always good for a few photos!
Showing posts with label Our Home. Show all posts
Showing posts with label Our Home. Show all posts
Thursday, April 5, 2012

Wednesday, August 31, 2011
The Making of the Lists
Hello Everyone. It's been a while since I have checked in. We have been going through some financial issues lately, which unfortunately has made me shy away from the blog. We have windows to fix, teeth to fix, house parts to fix & a new semester of college for my husband - which now that we are married, he gets FAR less financial assistance.
So we have been living pretty tight lately, forcing me to put a lot of projects on the shelf. I haven't wanted to spend the money. So what I wanted to do last night was to sit down, and put together a list of things to do to the house. Because I am the queen of lists, it helped me to organize my thoughts, and also to start having something to "check" things off of. While the list is overwhelming, there are certain things that we can start doing to check off the list, that have little or no cost associated with them.
So I decided that I wanted to take the list public - make myself start accomplishing things, so that our house can get "done", so that we have something to enjoy for the next few years, while we start to squirrel away pennies to save for our dream house.
I also want to start getting into showing everyone how we are doing things on a budget, how we are saving money, so that all those other people out there, who are struggling to make ends meet, can see that there is a way to achieve your goals without spending a lot of money.
But now we must get on to the good stuff...
THE LIST
The Living Room

1. Pull up the carpet
2. Refinish the floors (if required)
3. Make sliding "c" end tables
4. Hang artwork/photos
5. New Lamps
6. Refinish end tables
7. Rug(s)
8. Reorganize shelves on either side of fireplace
9. Silicone/caulk joint between baseboard & floor, once exposed
10. Acquire bookcase with glass doors to store movies
11. Clean out fireplace
12. Make Birch candles for fireplace (as seen HERE)
13. Find better location for Game Board & organize coffee table
14. Build second shelf in coat closet (above existing shelf)
15. Organize coat closet - making room for vacuums & shoes!
16. Purge old coats
17. Buy new large plant for room
The Dining Room

1. Pull up carpet
2. Refinish floors (if required)
3. Fix broken sash cord in window
4. Repaint trim after window repair
5. Silicone/caulk joint at baseboard & floor, once exposed.
6. Make new burlap table runner
The Kitchen

1. New Flooring - Rubberized Vinyl Sheet Flooring (with stamped tile pattern)
2. New Countertops (decide material)
3. Matching Pulls/Knobs for all cabinet doors
4. New Dishwasher
5. New Fridge (it will die in the not too distant future - better put it on the list!)
6. Smaller Microwave, maybe even one that can be mounted over the stove to give more counter space
7. Bench for mudroom
8. Window treatment for back door
9. Paint back door
The Half Bath

1. New shoe mold @ tile
2. Fix broken tiles (we are having an issue where the floor is moving a bit too much. It cracked two of our tiles under the toilet. We aren't going to fix it now, because it isn't obvious, but we will have to fix it eventually)
3. Finish attaching sink to wall with longer screw & silicone around edge of sink bowl.
4. Artwork & Baskets to finish decorating
The Third Bedroom
(I don't have an image for this room, but will edit it soon with a picture. This room is now our closet, but will eventually be a nursery, when we decide to have kids)
1. Pull up carpet
2. Refinish floors (as required)
3. Rug
4. Paint walls & trim
5. Silicone/caulk joint at baseboards & floor
6. Remove closet door & build two shelves above rod (the closet door is right behind the entry door - too many doors in such a little space)
7. Make curtains for 2 windows & closet door
8. New Furniture
9. Fix Broken window & dropped sash
Guest Bedroom
(Again, no photo here, and not a lot of work to do)
1. Pull up carpet
2. Refinish floors (as required)
3. Rug
4. Paint walls & trim
5. Silicone/caulk joint at baseboards & floor
6. New curtains for two windows
Master Bedroom

(Not a great picture, but it gives you an idea. Ignore the sheets - we need new sheets, in fact, lets make that number 1, shall we?)
1. New Sheets!
2. Pull up carpet
3. Refinish floors (as required)
4. Rugs - including maybe making a couple of t-shirt rugs (example HERE)!
5. Silicone/caulk joint at baseboard & floor
6. New Wardrobe, like the one seen HERE at IKEA
7. New bench @ window
8. Finish building nightstand, paint
9. Decorate nightstands
10. Enlarge existing closet opening & case opening
11. Make new curtains for 2 windows & closet (closet curtains are temporary)
12. New bi-fold closet doors
13. Fix broken window & dropped sash
Hallway
1. Pull up carpet
2. Refinish floors (as required)
3. Rug
4. Paint walls & trim
5. Silicone/caulk joint at baseboards & floor
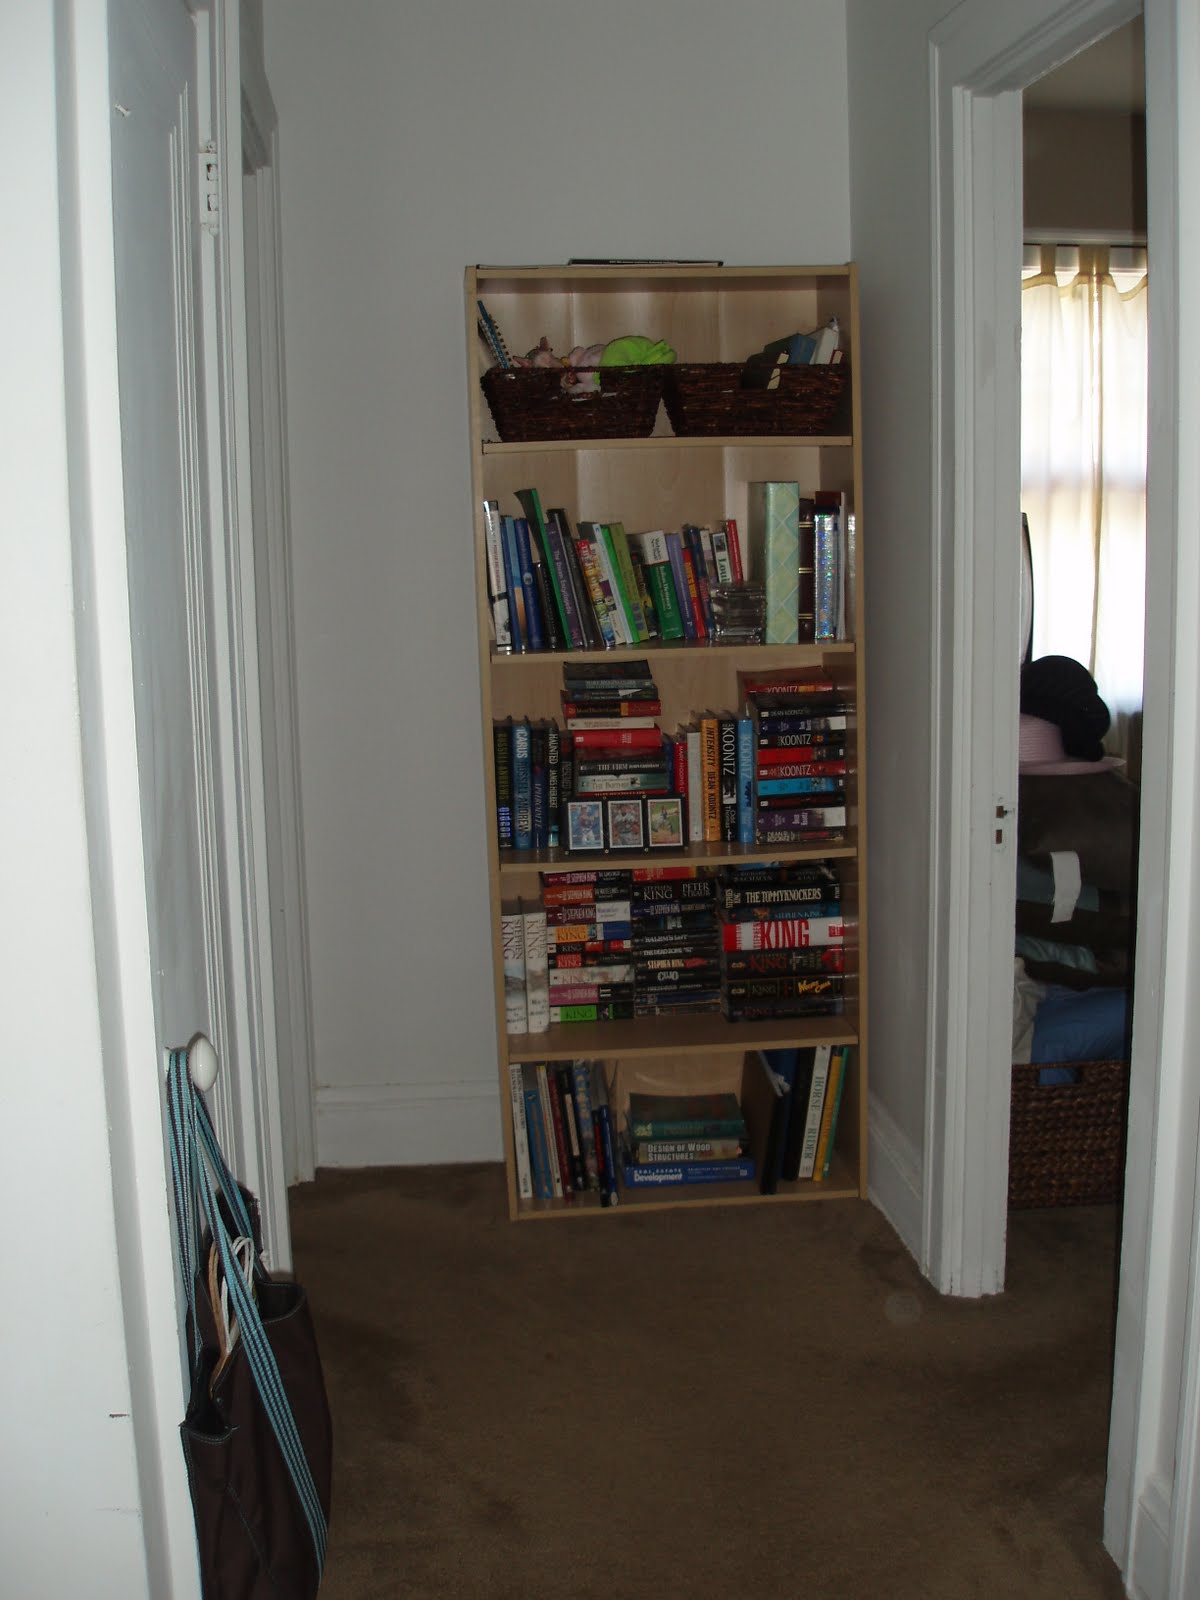
6. New bookshelf
7. Photo Wall
Outside

1. Paint railings at front porch
2. Paint porch floor
3. Replace any warped porch pieces (all three porches)
4. Repair damaged siding on garage
5. Paint garage
6. Finish cleaning up the planting beds & move plants around
7. Patch issue in roof over mudroom
8. Table for front porch & back patio
This is the bulk of the work that we'd like to do. Eventually, we'd like to put baseboard heaters in the finished attic space, so that it can technically be called a bedroom. We also have some cleaning and organizing to do in the basement. But that is our list. Daunting, no?
The goal will be to start going room to room & crossing things off. Unfortunately because my mind is always working, a few things might get added too.
Hopefully we can get started on some of the easier ones first. Like pulling up the carpet in the bedrooms - where the floor doesn't have to look perfect right away. I would really like to get started in our bedroom, since there is quite a bit of work to do there. We'll see what happens next!
Wednesday, July 20, 2011
A Little Curb Appeal
Admittedly, our yard has gotten a little out of control. The sod, and the weeds are literally destroying any type of "planting bed" that we have in our yard. This is in all beds, one in the front, one along the side and two in the back. So we decided that we would take care of this issue in stages... one bed at a time. And because our front yard is the one that most people see, it's the one that we decided to tackle first.
Here is what the bed looked like at the beginning of this quest:
 |
| Note that there is no visible boundary between the yard and the bed... |
Where is the bed exactly?, you ask... well it is just in front of the two trees, has a bit of a bend to it, and currently has hostas & lilies between it. Impossible to tell, I know. So Matt and I set to work to fix this issue. Of course by 9am when we started, it was already in the low 80's, so conditions weren't exactly ideal, but we worked our butts off - and I mean that quite literally.
I used the shovel seen in this photo, and Matt used a pick axe (which was by far the superior tool) to make this bed better. I scooped out the perimeter with the shovel, and then we went to work removing the sod and the weeds.
First problem that we encountered, this bed is filled with rocks, from where, I don't know, but the axe helped a lot in this area. Second problem, we dug up somewhere in the neighborhood of 30 small bulbs, most of which I expect are either grape hyacinths or crocuses... Problem number three was that it became very clear that previous to this layout that we inherited, there was a great deal of ground cover in this area, as we encountered a TON of spidery roots just under the surface. I was annoyed that the bulbs were planted so close to the surface, as I'm pretty sure I pulled up a few daffodil bulbs as well, and quickly replaced them. I am planning, once the weather has cooled to throw the small bulbs back in the ground and see what happens in the spring!
Our goal was to create a completely manageable, and cheaper "trench bed", where no landscaping border was required, and no edging of the lawn would be required. This will make the upkeep of this area much easier for us. It also made the project cheaper as bricks, wood, or any other misc. landscaping border techniques can add considerable cost to your project.
To do this we made a very clear line between the grass and the dirt, digging down around 3 inches to make an obvious distinction. After we removed the sod and weeds and tilled the soil a bit, we added two bags of hummus and 8 bags of topsoil to the bed. We mixed the new soil in with the old, and mounded it up toward the back, maintaining a "trench" at the front. This makes it easy to prevent over watering, it also allows you to put the wheel of the lawn mower here for easy trimming.
So after several hours, the use of dozens of tools from our garage, 10 bags of dirt & at least 4 water bottles full of ice water, this is what we had done (note that the shadow of the trees make it harder to see):


You can see an edge, and even dirt! Where before all you saw were weeds and grass. And there is an extra shot of the trench so you can see our plan. Next year we will plan what we want to plant where. I think adding a little color under the burning bushes is necessary, however it has to be something that complements the bright red color that they will become in the next few months!
I am happy with the change, and looking forward to working on all the other beds in the yard!
What curb appeal changes have you been making to your homes?
Tuesday, May 31, 2011
Bathroom Reno: The Fixtures & Final Touches
Well we have gotten through the bulk of the difficult process. The next part was to add the toilet, add the sink & put up the finishing touches.
We got a new Kohler toilet (YAY) which was actually pretty easy to install. With the new flange down, we put on the wax ring, put on the washers and stuck the thing down. Matt sat on it and tightened the bolts to the floor. It is a 2-piece toilet, so next we had to add the back. Luckily the tank came with all of it's guts included (which is the hardest part about putting together a toilet), so we just had to put it on, level the tank, tighten the bolts & start the water. Putting the toilet in might have been the easiest part of the job.

We got a pedestal sink, which we actually took into the dining room to assemble so that we would have more room. We used plumbers putty to put in the drain, we attached the faucet, and all the guts of the sink in the other room. We put the sink on the base, which we just set upright in front of the waste pipe. Turns out that the pipe was too short, so we had to run back to the hardware store to get some extra PVC.
The most difficult part was tightening the screws to attach it to the wall. There was no real way of knowing exactly how long of anchors to put in the wall. So we guessed, and the odds are that we probably should have gotten longer ones, regardless, we installed the sink in a couple hours. We added a mirror & a shade to complete the look. However, one of my favorite parts was the shelf that my wonderful husband built over the toilet.
Because we had removed all the storage in the room by taking out the medicine cabinet & the vanity, we needed a shelf to put things on. So Matt put up three sides on the wall, permanently with screws, countersunk & filled with wood glue. He then made an L-shaped shelf that slid in to the three sides perfectly. This shelf can be removed easily to work on the toilet if need be. He painted and primed the shelf.
And without further ado, here is our bathroom, in all of it's glory:


Okay, so there are still a few things to do. We need to touch up the paint, paint the ceiling, add a shoe mold to the baseboard to cover up the gap between the tile & the baseboard. I'd like to paint the door, adding a nice dark grey accent to compliment the room.
I'm currently working on some wall art for over the toilet. I'm waiting to get a great wicker box to keep some toiletries in, so that they don't have to just sit on the shelf. We also have an issue at the threshold that we are still trying to figure out.
All of this will happen later. For now the bathroom is done, functional, and not something we have to pine over every day. And we LOVE it!!! What do you guys think?
If you haven't caught the posts that lead up to this, check out the following links: Demo Day, The Reconstruction, and A World of Tiling
Thanks for reading, hope you love what you see!
We got a new Kohler toilet (YAY) which was actually pretty easy to install. With the new flange down, we put on the wax ring, put on the washers and stuck the thing down. Matt sat on it and tightened the bolts to the floor. It is a 2-piece toilet, so next we had to add the back. Luckily the tank came with all of it's guts included (which is the hardest part about putting together a toilet), so we just had to put it on, level the tank, tighten the bolts & start the water. Putting the toilet in might have been the easiest part of the job.

See, no way to see the tile that was cut in half now!
We got a pedestal sink, which we actually took into the dining room to assemble so that we would have more room. We used plumbers putty to put in the drain, we attached the faucet, and all the guts of the sink in the other room. We put the sink on the base, which we just set upright in front of the waste pipe. Turns out that the pipe was too short, so we had to run back to the hardware store to get some extra PVC.
The most difficult part was tightening the screws to attach it to the wall. There was no real way of knowing exactly how long of anchors to put in the wall. So we guessed, and the odds are that we probably should have gotten longer ones, regardless, we installed the sink in a couple hours. We added a mirror & a shade to complete the look. However, one of my favorite parts was the shelf that my wonderful husband built over the toilet.
Because we had removed all the storage in the room by taking out the medicine cabinet & the vanity, we needed a shelf to put things on. So Matt put up three sides on the wall, permanently with screws, countersunk & filled with wood glue. He then made an L-shaped shelf that slid in to the three sides perfectly. This shelf can be removed easily to work on the toilet if need be. He painted and primed the shelf.
And without further ado, here is our bathroom, in all of it's glory:

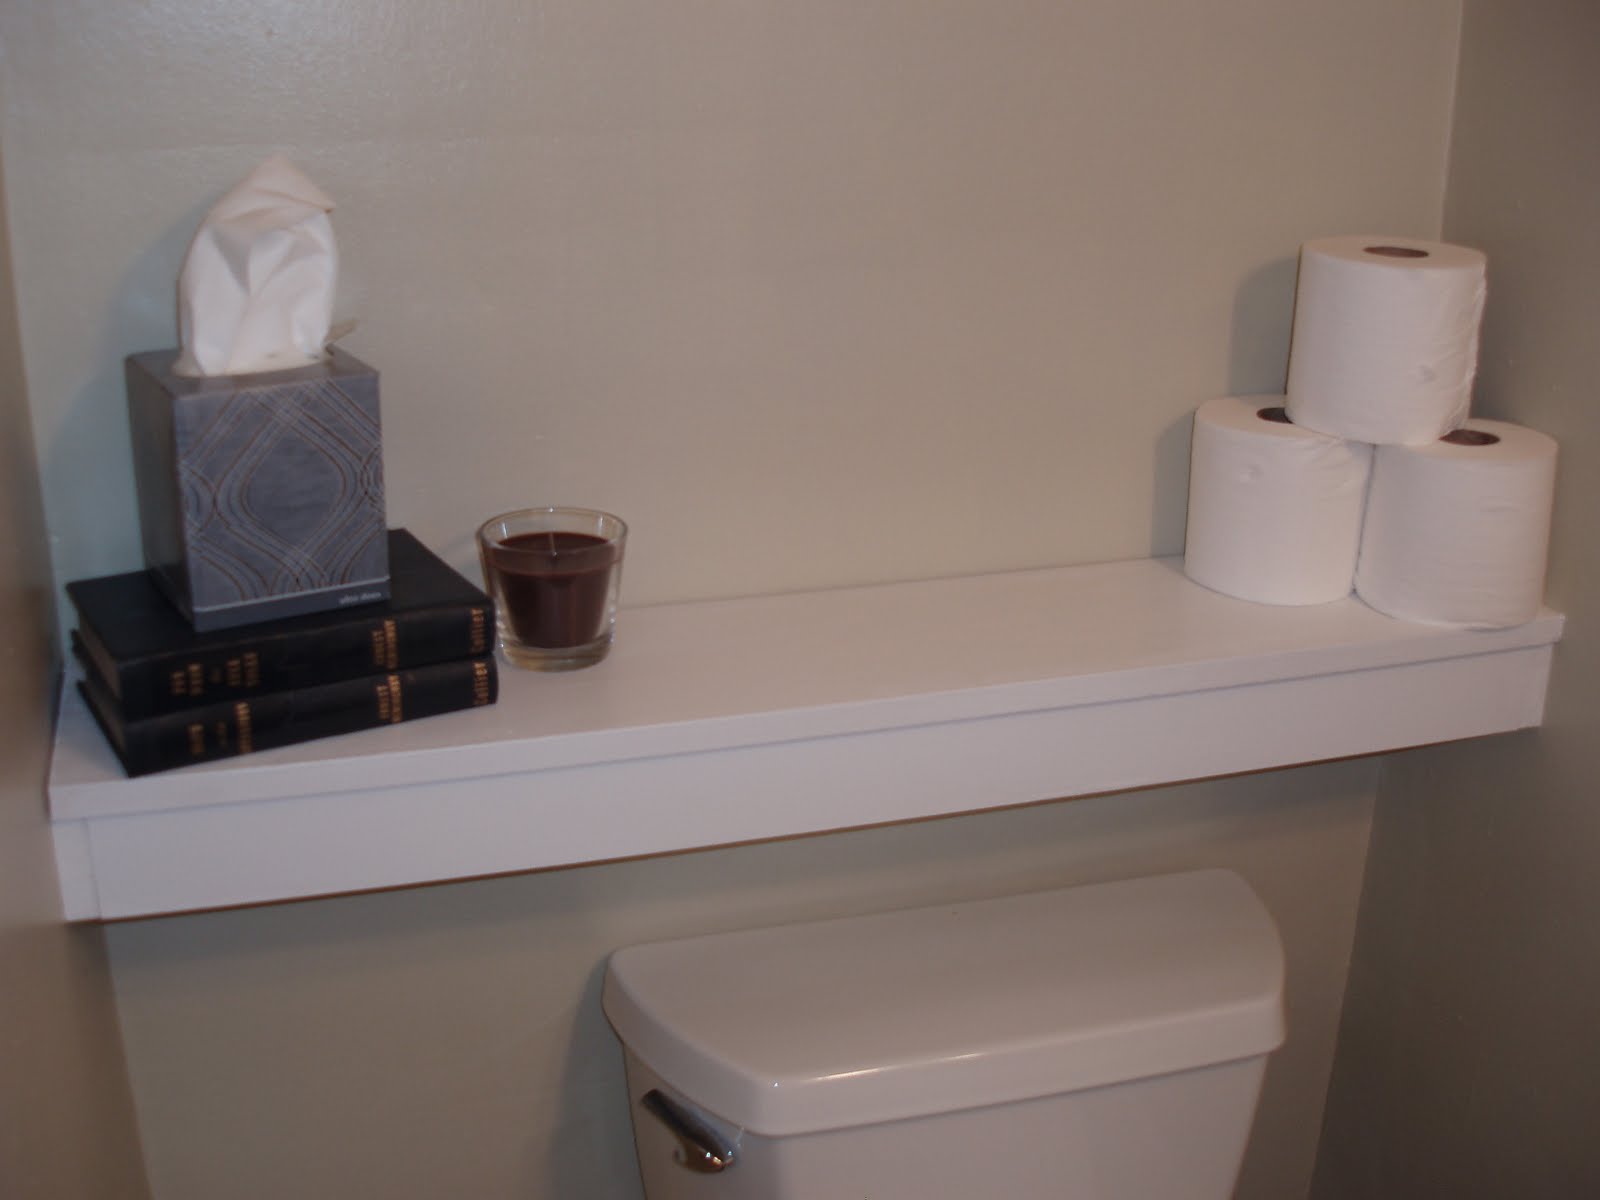

Okay, so there are still a few things to do. We need to touch up the paint, paint the ceiling, add a shoe mold to the baseboard to cover up the gap between the tile & the baseboard. I'd like to paint the door, adding a nice dark grey accent to compliment the room.
I'm currently working on some wall art for over the toilet. I'm waiting to get a great wicker box to keep some toiletries in, so that they don't have to just sit on the shelf. We also have an issue at the threshold that we are still trying to figure out.
All of this will happen later. For now the bathroom is done, functional, and not something we have to pine over every day. And we LOVE it!!! What do you guys think?
If you haven't caught the posts that lead up to this, check out the following links: Demo Day, The Reconstruction, and A World of Tiling
Thanks for reading, hope you love what you see!
Monday, May 30, 2011
Bathroom Reno: A World of Tiling
We left off with a room that had new baseboards, a new light fixture, paint & a panel of Hardie Board on the floor. The problem that we encountered for the next few weeks, was that everything we put down on the floor required 24 hours to dry, before we could do anything else. So since the Hardie Board was down, we could begin tiling.
We started with a pattern. Because the room was small, we didn't have a lot of options. We could either put a single row down the middle with 3/4 tiles surrounding the full ones, or a double row of full tiles down the middle with a 1/4 tile around the border. Because nothing in the room was centered, we selected to put in as many large tiles as we could, selecting the two down the middle pattern.
Putting down square or straight cut tile was fairly easy. For the straight cuts, we used a tile cutter, a tool that looked like this:

I questioned whether this would actually work, as it was just a little wheel that scores the tile with a flat plate, that when pushed down, cracked the tile along the score line. Much to my amazement, it worked perfectly, and I would recommend picking one of these up. Much less mess than a wet saw, and very quick to work.
So we started by laying the full tiles. The hardest part is to get them level in a room that isn't flat. Matt did most of this work on his days off, as the room is not big enough for two people to be working in at the same time. Then we did the 1/4 tiles around the perimeter. Because the home is old and the room is not square, we had to get a little fancy with cutting the tiles.
We used 1/8" spacers, to give the grout a thin and more modern look.
Now for the hard part, CUTTING THROUGH PORCELAIN TILE!!! This is maybe the most frustrating thing that we have ever done in our lives... We sought out lots of advice from friends and home improvement helpers alike, all with different opinions, so we'll tell you what worked best for us.
We started with the easiest of the cuts. We had a small square cut that needed to be cut around the water pipe for the toilet. One person had suggested using the same jigsaw blade that we had used to cut through the hardie board with. It essentially looks like a nail file for a jigsaw. It worked great in the hardie board, unfortunately, not so well in the tile. Half way through the straight cut, the blade kinked, jumped and bent in half. At $10 a blade, that was the end of that experiment. We finished the cut with the tile cutter, working very carefully.
Next we started with the second most complicated hole... the round hole for the toilet. One person suggested using a concrete bit for the drill, to drill through the tile, then to use the jigsaw to cut the circle. Well we knew how well that was working, but we were going to try it. It just so worked out that the hole for the toilet was right in the middle of a tile. Well, first shot with the new $15 drill bit, and crack, the tile split in half. Not to mention that the tip of the drill bit had melted from the work it was doing.... this was NOT the way to cut this hole.
So we went with the next piece of advice we had heard. We cut the tile right down the middle of the hole with the tile cutter, so that half of the waste hole was in each half. We would set the tile back together and grout the crack so that it wouldn't be noticed (you can see this in the finished photo at the bottom. In fact the whole thing was going to be under the toilet, so it wouldn't be noticed anyways. We then used a wet saw to make dozens of straight cuts into the tile to make the shape of the circle, like this:

We then used a pair of tile nippers that look like this, to "snip" off the tile into a nice circular pattern:
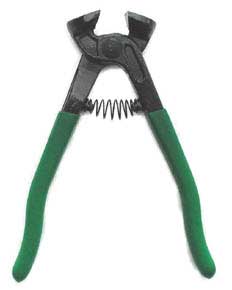
You put the flat ends on the tile and "snip" off the tile. Definitely read up before using these, you aren't supposed to really "nip" at the tile, you are supposed to grab and apply pressure to snap it, not really biting at the tile. This actually worked great to get the hole done.
The next set of holes was going to prove to be the most difficult. You see, when you put down the toilet, you need to put down a new toilet flange. Well you have to screw the new flange down through this tile, so you need to cut 6, yes SIX small holes through the tile, in very VERY close proximity to the big waste hole to accomplish this.
Well we had purchased a masonry tip, but after our last experience we knew that it wouldn't work, so we went back to the hardware store and purchased a diamond tip drill bit. This was specifically for glass and tile.
Matt started the drilling and after about 10 minutes on the first hole, crack, the corner of the tile split off. We decided that it was a split that we could deal with so he went on to the next hole. He eased up on the pressure, and had kept a wet sponge next to the drill bit. The second hole went all the way through after about 15 minutes. However, the third hole split the tile in half... Almost an entire day of drilling and another tile was ruined.

These tools were exactly what we needed, and after about 5 minutes per hole, the job was complete... frustration be... well you know what. We then cut and put down the rest of the tile pieces.
After everything dried the appropriate amount of time, we grouted the tile. Grouting was fairly easy, it's really just shoving grout into the voids between the tile, and wiping the excess off. And for the finished product, here you go:


You can see the line down the middle of the waste hole and the six smaller holes around it, boy was this job way more complicated than we anticipated for this size room, but man did it look amazing compared to the carpet that was there before! Whew.. another job done, and another post done.
To see how we got to this point check out the following posts: Bathroom Reno: Demo Day & Bathroom Reno: The Reconstruction
We started with a pattern. Because the room was small, we didn't have a lot of options. We could either put a single row down the middle with 3/4 tiles surrounding the full ones, or a double row of full tiles down the middle with a 1/4 tile around the border. Because nothing in the room was centered, we selected to put in as many large tiles as we could, selecting the two down the middle pattern.
Putting down square or straight cut tile was fairly easy. For the straight cuts, we used a tile cutter, a tool that looked like this:
I questioned whether this would actually work, as it was just a little wheel that scores the tile with a flat plate, that when pushed down, cracked the tile along the score line. Much to my amazement, it worked perfectly, and I would recommend picking one of these up. Much less mess than a wet saw, and very quick to work.
So we started by laying the full tiles. The hardest part is to get them level in a room that isn't flat. Matt did most of this work on his days off, as the room is not big enough for two people to be working in at the same time. Then we did the 1/4 tiles around the perimeter. Because the home is old and the room is not square, we had to get a little fancy with cutting the tiles.
We used 1/8" spacers, to give the grout a thin and more modern look.
Now for the hard part, CUTTING THROUGH PORCELAIN TILE!!! This is maybe the most frustrating thing that we have ever done in our lives... We sought out lots of advice from friends and home improvement helpers alike, all with different opinions, so we'll tell you what worked best for us.
We started with the easiest of the cuts. We had a small square cut that needed to be cut around the water pipe for the toilet. One person had suggested using the same jigsaw blade that we had used to cut through the hardie board with. It essentially looks like a nail file for a jigsaw. It worked great in the hardie board, unfortunately, not so well in the tile. Half way through the straight cut, the blade kinked, jumped and bent in half. At $10 a blade, that was the end of that experiment. We finished the cut with the tile cutter, working very carefully.
Next we started with the second most complicated hole... the round hole for the toilet. One person suggested using a concrete bit for the drill, to drill through the tile, then to use the jigsaw to cut the circle. Well we knew how well that was working, but we were going to try it. It just so worked out that the hole for the toilet was right in the middle of a tile. Well, first shot with the new $15 drill bit, and crack, the tile split in half. Not to mention that the tip of the drill bit had melted from the work it was doing.... this was NOT the way to cut this hole.
So we went with the next piece of advice we had heard. We cut the tile right down the middle of the hole with the tile cutter, so that half of the waste hole was in each half. We would set the tile back together and grout the crack so that it wouldn't be noticed (you can see this in the finished photo at the bottom. In fact the whole thing was going to be under the toilet, so it wouldn't be noticed anyways. We then used a wet saw to make dozens of straight cuts into the tile to make the shape of the circle, like this:

We then used a pair of tile nippers that look like this, to "snip" off the tile into a nice circular pattern:
You put the flat ends on the tile and "snip" off the tile. Definitely read up before using these, you aren't supposed to really "nip" at the tile, you are supposed to grab and apply pressure to snap it, not really biting at the tile. This actually worked great to get the hole done.
The next set of holes was going to prove to be the most difficult. You see, when you put down the toilet, you need to put down a new toilet flange. Well you have to screw the new flange down through this tile, so you need to cut 6, yes SIX small holes through the tile, in very VERY close proximity to the big waste hole to accomplish this.
Well we had purchased a masonry tip, but after our last experience we knew that it wouldn't work, so we went back to the hardware store and purchased a diamond tip drill bit. This was specifically for glass and tile.
Matt started the drilling and after about 10 minutes on the first hole, crack, the corner of the tile split off. We decided that it was a split that we could deal with so he went on to the next hole. He eased up on the pressure, and had kept a wet sponge next to the drill bit. The second hole went all the way through after about 15 minutes. However, the third hole split the tile in half... Almost an entire day of drilling and another tile was ruined.
These tools were exactly what we needed, and after about 5 minutes per hole, the job was complete... frustration be... well you know what. We then cut and put down the rest of the tile pieces.
After everything dried the appropriate amount of time, we grouted the tile. Grouting was fairly easy, it's really just shoving grout into the voids between the tile, and wiping the excess off. And for the finished product, here you go:


You can see the line down the middle of the waste hole and the six smaller holes around it, boy was this job way more complicated than we anticipated for this size room, but man did it look amazing compared to the carpet that was there before! Whew.. another job done, and another post done.
To see how we got to this point check out the following posts: Bathroom Reno: Demo Day & Bathroom Reno: The Reconstruction
Saturday, May 28, 2011
Bathroom Reno: The Reconstruction Begins
We left off yesterday with a totally destroyed 91 year old half bathroom. We slept like rocks, and then it was off to Home Depot to pick up some supplies that we couldn't have predicted we would have needed. I went to pick up some flat 1x6 and profiled trim to fix the baseboard while my husband got a little more shut eye.
While I was there, I picked up some finishing nails and actually had to purchase chair rail to find something tall and wide enough to replace the missing molding. If you remember, the wall area looked like this when we were done with the demolition:

You can see the missing baseboard and the missing molding in the photo above. We don't have a compound miter saw, so we had to improvise with the tools required to cut the molding at a 45 degree angle. We used a jigsaw & eyeballed it. Luckily there was caulk and wood glue to fill in any gaps.... or at least that's what we thought.
Three of the walls proved to be fairly simple to fix, even the place where the flat board was missing. We did have to chisel out a bit of baseboard that was below the plywood floor to slip in the new flat board, but that wasn't our biggest issue - it was the 4th wall, the one behind the toilet, the one that we haven't completely finalized yet. The plaster on all walls ended about 1/4" below the molding. In most places this wasn't an issue, but on the 4th wall, the lath was about 1-1/2" away from the face of the plaster. Here is a photo using my finger as a guide:

Please notice that you can't see my first knuckle. That's how far away the wall was, and because the chair molding that we got was actually 1/4" shorter than the molding that was there, there would be nothing to support the new molding with. There was also nothing to nail it into.
So what we planned on doing was nailing the trim to the flat board beneath it, then just caulking the joint. Again, on three walls, this worked perfectly. The fourth wall was NOT pretty, and still is only partially fixed. What we will eventually do is to place a thin board along the wall and paint it to match the wall so that any larger gaps will be covered.
So it took a while to get the old wood chiseled, the new wood cut, the molding cut at an angle with the wrong tools, and nailing straight down with a large hammer on profiled wood. In fact it took us the whole day, when you include caulking and adding wood glue. Here is the photo after the new baseboards were installed.


We had to buy a fancy bit for the jigsaw to cut the holes in the Hardie Board, as it is a cementitious material. Just a little heads up, cutting circles is difficult. Turns out that the can of french fried onions on our shelf was the exact same diameter as the waste pipe, so that's what we used to draw the circle. Then Matt cut a straight line in the board down to the circle and slowly cut out a circle. He had to take a second pass to make it a little wider, but it fit perfectly.
Matt was busy the next few days, so I painted the baseboards, primed and painted the walls, and finished with any wall repairs. See the gap in the back wall in the photo above, most of that was able to be patched, some wasn't, but it's behind the toilet, so any "patch" has been delayed.
So that was the beginning of putting things back together. Next step: Tiling.... another post that is not to be missed. Hopefully it will be full of little tips to help you to get through it better than we did!!
While I was there, I picked up some finishing nails and actually had to purchase chair rail to find something tall and wide enough to replace the missing molding. If you remember, the wall area looked like this when we were done with the demolition:

Three of the walls proved to be fairly simple to fix, even the place where the flat board was missing. We did have to chisel out a bit of baseboard that was below the plywood floor to slip in the new flat board, but that wasn't our biggest issue - it was the 4th wall, the one behind the toilet, the one that we haven't completely finalized yet. The plaster on all walls ended about 1/4" below the molding. In most places this wasn't an issue, but on the 4th wall, the lath was about 1-1/2" away from the face of the plaster. Here is a photo using my finger as a guide:

Please notice that you can't see my first knuckle. That's how far away the wall was, and because the chair molding that we got was actually 1/4" shorter than the molding that was there, there would be nothing to support the new molding with. There was also nothing to nail it into.
So what we planned on doing was nailing the trim to the flat board beneath it, then just caulking the joint. Again, on three walls, this worked perfectly. The fourth wall was NOT pretty, and still is only partially fixed. What we will eventually do is to place a thin board along the wall and paint it to match the wall so that any larger gaps will be covered.
So it took a while to get the old wood chiseled, the new wood cut, the molding cut at an angle with the wrong tools, and nailing straight down with a large hammer on profiled wood. In fact it took us the whole day, when you include caulking and adding wood glue. Here is the photo after the new baseboards were installed.

We added caulking in the floor holes, patched messed up plaster and even installed the light fixture with the rest of that day. The next day was a Monday, so we only had a few hours after work to do some work. So we threw down thin set, and put the Hardie Board into place, screwing it down at 8" on center. Here is a photo of the Hardie Board in place:
Matt was busy the next few days, so I painted the baseboards, primed and painted the walls, and finished with any wall repairs. See the gap in the back wall in the photo above, most of that was able to be patched, some wasn't, but it's behind the toilet, so any "patch" has been delayed.
So that was the beginning of putting things back together. Next step: Tiling.... another post that is not to be missed. Hopefully it will be full of little tips to help you to get through it better than we did!!
Friday, May 27, 2011
Bathroom Reno: Demo Day
Ladies and Gentlemen! We are back!!!
The half bathroom is about 85% finished, but it's done enough to give you all an update on the progress of the room.
Just for a refresher, you should remember the bathroom looking like this:

Please note the old vanity, the medicine cabinet, and the horrible carpet on the floor. But those are only the immediate things that you will notice. What you can't see is a crack in the toilet, from the floor to the top of the bowl. You can't see awful plastic blinds on the window, or the 1970's era light fixture above the medicine cabinet. This room needed to be fixed, immediately. So after what was literally YEARS of planning, we shut down the bathroom and started the renovation.
And because the first morning was crazy and not many photos were taken, after about 6 hours at least as many trips to the home improvement store, the same wall looked like this:

Now don't let the fact that the room doesn't look that different, deceive you. There aren't a TON of pictures that came from the disaster that we will refer to as "Demo Day". However, this day alone will occupy an entire post.
We begin this story first thing in the morning. We went once to Lowe's to purchase the light fixture, then to Home Depot to get various building supplies: Hardie Board, thinset, grout, tile spacers, etc... Then we headed back home to start the demolition. Luckily we had another toilet in our home, because this project ended up taking WAY longer than either one of us had planned. We thought we could finish it in a week or two, but with work, school, final exams, it ended up taking us a month to get to the 85% mark, where we are today.
Our first job was to remove the sink, the area that you see in the photo above. Only it wasn't as easy as one would think. You think, turn off the water, cut the sealant, unhook the supply and waste lines and remove the vanity... HA, if only it were that easy. We attempted to turn the knobs to the water shut offs. The hot turned off immediately, however the cold, wouldn't turn. So my loving husband grabbed a pair of pliers, turned the knob, and then crack... the knob broke. So off to our local hardware store, where we purchased two new valves.
We got home, turned off the hot and cold supplies to the bathroom, removed the hot water valve, then the cold water valve... however the water wasn't off. How this happened I still don't know. So I went running into the basement to turn off the main water supply. When we went to put the new valves on, they didn't fit, so back to the hardware store we went. He supplied us with a couple parts that he thought would fix the problem. We got back home, and nope, that didn't help. So we brought the old valve and one of the new valves back to the local hardware store.
They directed us to the valves that we did want - and if you are keeping track, this was trip number 5 to various hardware stores that morning. While we were there I also picked up two escutcheon plates to fit around the pipes so that you wouldn't see the abused plaster. Unfortunately, i had not brought back all of the original parts, so that meant that trip number 6 would be occurring later, regardless.
Luckily, these valves worked. It took a lot of work to get them to attach correctly, and to keep the water from leaking everywhere... but eventually it was done. We could now remove the supply lines. Then we unattached the waste line, and attempted to remove the sink. First we noticed that there were two screws that were holding the sink into the wall, so after contorting ourselves to remove them, we again tried to remove the sink, to no avail. We rocked it back and forth, cutting at sealant that we thought we were through, just trying to find where it was still attached.
We finally realized that some genius had cut part of the baseboard to fit the vanity in, not all of the baseboard, just some of it, and then screwed the bottom of the vanity into the side of the baseboard that was left. Without an image, it's hard to show, and I'm sorry, but at the end of the day, it took us HOURS to remove the sink.
We, quite easily and quickly, after that removed the toilet, the carpet, and the remnants of vinyl flooring that was left under the carpet. We cut the rest of the hacked up baseboard that was left behind the vanity, and Viola! You have the photo above.
Because the baseboard was in two parts, a flat board and a profiled one, and the top part was impossible to match where it had been removed, we had to remove all of the top piece of baseboard, and tried to salvage what was left of the bottom piece. Here is another photo of the "toilet remains", and showing the missing piece of molding.

The plywood that was left was in decent condition, so we worked with what we had. That plywood actually sat on top of the original hardwood floor, so the bottom of the baseboards were actually hidden beneath the plywood. Luckily they were very tall, so there was no need to go back to the original floor.
Also, interesting fact, if you look back at the first demo picture, you can see two small holes in the floor, any idea what they are? I knew immediately. I had always questioned whether this TINY little room was always a bathroom and those two little holes confirmed it for me. It was always a bathroom, with a tiny corner sink. The two holes were for the water pipes coming up through the floor. I have seen this around my neighborhood before, so that's why I knew right away.
So, while demo was exhausting that day, it was just as exhausting recounting it all for you here this evening. So I will end the post there, and start with the reconstruction soon. Before you know it, you'll see the bathroom completed. Hopefully you enjoy the process more than we did!!!
The half bathroom is about 85% finished, but it's done enough to give you all an update on the progress of the room.
Just for a refresher, you should remember the bathroom looking like this:

Please note the old vanity, the medicine cabinet, and the horrible carpet on the floor. But those are only the immediate things that you will notice. What you can't see is a crack in the toilet, from the floor to the top of the bowl. You can't see awful plastic blinds on the window, or the 1970's era light fixture above the medicine cabinet. This room needed to be fixed, immediately. So after what was literally YEARS of planning, we shut down the bathroom and started the renovation.
And because the first morning was crazy and not many photos were taken, after about 6 hours at least as many trips to the home improvement store, the same wall looked like this:

We begin this story first thing in the morning. We went once to Lowe's to purchase the light fixture, then to Home Depot to get various building supplies: Hardie Board, thinset, grout, tile spacers, etc... Then we headed back home to start the demolition. Luckily we had another toilet in our home, because this project ended up taking WAY longer than either one of us had planned. We thought we could finish it in a week or two, but with work, school, final exams, it ended up taking us a month to get to the 85% mark, where we are today.
Our first job was to remove the sink, the area that you see in the photo above. Only it wasn't as easy as one would think. You think, turn off the water, cut the sealant, unhook the supply and waste lines and remove the vanity... HA, if only it were that easy. We attempted to turn the knobs to the water shut offs. The hot turned off immediately, however the cold, wouldn't turn. So my loving husband grabbed a pair of pliers, turned the knob, and then crack... the knob broke. So off to our local hardware store, where we purchased two new valves.
We got home, turned off the hot and cold supplies to the bathroom, removed the hot water valve, then the cold water valve... however the water wasn't off. How this happened I still don't know. So I went running into the basement to turn off the main water supply. When we went to put the new valves on, they didn't fit, so back to the hardware store we went. He supplied us with a couple parts that he thought would fix the problem. We got back home, and nope, that didn't help. So we brought the old valve and one of the new valves back to the local hardware store.
They directed us to the valves that we did want - and if you are keeping track, this was trip number 5 to various hardware stores that morning. While we were there I also picked up two escutcheon plates to fit around the pipes so that you wouldn't see the abused plaster. Unfortunately, i had not brought back all of the original parts, so that meant that trip number 6 would be occurring later, regardless.
Luckily, these valves worked. It took a lot of work to get them to attach correctly, and to keep the water from leaking everywhere... but eventually it was done. We could now remove the supply lines. Then we unattached the waste line, and attempted to remove the sink. First we noticed that there were two screws that were holding the sink into the wall, so after contorting ourselves to remove them, we again tried to remove the sink, to no avail. We rocked it back and forth, cutting at sealant that we thought we were through, just trying to find where it was still attached.
We finally realized that some genius had cut part of the baseboard to fit the vanity in, not all of the baseboard, just some of it, and then screwed the bottom of the vanity into the side of the baseboard that was left. Without an image, it's hard to show, and I'm sorry, but at the end of the day, it took us HOURS to remove the sink.
We, quite easily and quickly, after that removed the toilet, the carpet, and the remnants of vinyl flooring that was left under the carpet. We cut the rest of the hacked up baseboard that was left behind the vanity, and Viola! You have the photo above.
Because the baseboard was in two parts, a flat board and a profiled one, and the top part was impossible to match where it had been removed, we had to remove all of the top piece of baseboard, and tried to salvage what was left of the bottom piece. Here is another photo of the "toilet remains", and showing the missing piece of molding.

The plywood that was left was in decent condition, so we worked with what we had. That plywood actually sat on top of the original hardwood floor, so the bottom of the baseboards were actually hidden beneath the plywood. Luckily they were very tall, so there was no need to go back to the original floor.
Also, interesting fact, if you look back at the first demo picture, you can see two small holes in the floor, any idea what they are? I knew immediately. I had always questioned whether this TINY little room was always a bathroom and those two little holes confirmed it for me. It was always a bathroom, with a tiny corner sink. The two holes were for the water pipes coming up through the floor. I have seen this around my neighborhood before, so that's why I knew right away.
So, while demo was exhausting that day, it was just as exhausting recounting it all for you here this evening. So I will end the post there, and start with the reconstruction soon. Before you know it, you'll see the bathroom completed. Hopefully you enjoy the process more than we did!!!
Thursday, April 28, 2011
The Bathroom Accessories
I honestly tried to bring photos to work today, so that I might update you on the progress of our half bath. Unfortunately, the archaic computers at our office do not accept our Memory Card, so alas, you will have to wait a little longer to see progress.
The new baseboard & molding are in. Last night we put down the Hardy Board Panel. Tonight we are busy, and part of this weekend my husband is away, so I will work on priming, caulking, spackling, sanding & painting while he is gone, so that when he returns we can tile, grout & install fixtures! Yay. Granted that is probably another whole week worth of work, but I am sooo excited to get this done.
Well with a new bathroom comes the need for new accessories. I think I am going to keep the bathroom somewhat neutral. Our trim is bright white & the walls will be "Sand Fossil". It's a beachy warm grey with a slight yellow green undertone, hard to see the undertone, but here is the color:

Our tile is an old clearanced tile from Lowe's that we picked up years ago. It is filled with warm greys, oranges, a little gold & JUST a hint of green-grey. Something like this but more orange than red:
Our fixtures are bright white, our faucet, handles & accessories are chrome or brushed nickel.
So what to do about bath mats, towels, art....
First, the bath mat. The half bath has NO heat in the room. We keep the door open in the winter so that some of the heat from the basement & kitchen end up warming the room up a bit. The tile floor is not going to help this issue, so we will need a small mat to keep the floor warm in the winter. I don't want to cover up all of the lovely tile, so it will probably be a neutral warm grey mat that can be slid around the room where needed.
Second, the towels. I think we will probably go with the same neutral warm grey towels. I wanted to do maybe an orange or gold, a pop of color, and I still might, but the intention is to make the room warm, updated & clean, far from what it used to look like. You will remember it looking like this:

We just can't wait to have it new and refreshed. We can mess with the color of the accessories once things are done. I don't mind buying a couple different color hand towels!
Third, the art. We will be installing a shelf on the wall over the toilet. Something easy, painted the color of the wall, so that we might have some additional storage in the room. Because we are removing the vanity, we will need a place to put some things. This also gives us the opportunity to add a little flair to the room: a stack of books, a gilded initial for our last name, then we will hang something great from the wall over the shelf. What? We don't know yet, but it will make the room look finished.
I would like to add a small storage unit in the room to store cleaning supplies, extra towels, etc. Something like this:
I love the look of dark wicker & a small thin storage tower than can go between the wall and the sink is exactly what I'm looking for. This particular unit would be a little wide for the space we have.
And lastly the window treatments. What I want to do is to frost the window. This will let in a lot of light and block the view (as the bathroom is right on our driveway). I would then like to get a dark brown bamboo shade & possibly accent with a curtain pulled to the side. The dark bamboo will match a dark wicker storage bin. If we do a curtain, I would get a similar color hand towel. This is where we would add some color. Maybe a neutral green or pale yellow. Something bright that isn't BRIGHT.
I can't wait to share more photos with you, so you can see what a challenge this re-do has become already!
The new baseboard & molding are in. Last night we put down the Hardy Board Panel. Tonight we are busy, and part of this weekend my husband is away, so I will work on priming, caulking, spackling, sanding & painting while he is gone, so that when he returns we can tile, grout & install fixtures! Yay. Granted that is probably another whole week worth of work, but I am sooo excited to get this done.
Well with a new bathroom comes the need for new accessories. I think I am going to keep the bathroom somewhat neutral. Our trim is bright white & the walls will be "Sand Fossil". It's a beachy warm grey with a slight yellow green undertone, hard to see the undertone, but here is the color:
 |
| Shown: Mt. Everest Verde - Home Depot |
So what to do about bath mats, towels, art....
First, the bath mat. The half bath has NO heat in the room. We keep the door open in the winter so that some of the heat from the basement & kitchen end up warming the room up a bit. The tile floor is not going to help this issue, so we will need a small mat to keep the floor warm in the winter. I don't want to cover up all of the lovely tile, so it will probably be a neutral warm grey mat that can be slid around the room where needed.
Second, the towels. I think we will probably go with the same neutral warm grey towels. I wanted to do maybe an orange or gold, a pop of color, and I still might, but the intention is to make the room warm, updated & clean, far from what it used to look like. You will remember it looking like this:
We just can't wait to have it new and refreshed. We can mess with the color of the accessories once things are done. I don't mind buying a couple different color hand towels!
Third, the art. We will be installing a shelf on the wall over the toilet. Something easy, painted the color of the wall, so that we might have some additional storage in the room. Because we are removing the vanity, we will need a place to put some things. This also gives us the opportunity to add a little flair to the room: a stack of books, a gilded initial for our last name, then we will hang something great from the wall over the shelf. What? We don't know yet, but it will make the room look finished.
I would like to add a small storage unit in the room to store cleaning supplies, extra towels, etc. Something like this:
 |
| Madras - 3-Drawer Tower - World Market |
I love the look of dark wicker & a small thin storage tower than can go between the wall and the sink is exactly what I'm looking for. This particular unit would be a little wide for the space we have.
And lastly the window treatments. What I want to do is to frost the window. This will let in a lot of light and block the view (as the bathroom is right on our driveway). I would then like to get a dark brown bamboo shade & possibly accent with a curtain pulled to the side. The dark bamboo will match a dark wicker storage bin. If we do a curtain, I would get a similar color hand towel. This is where we would add some color. Maybe a neutral green or pale yellow. Something bright that isn't BRIGHT.
I can't wait to share more photos with you, so you can see what a challenge this re-do has become already!
Tuesday, April 26, 2011
Where have you been?
I apologize, it has been an extraordinarily long time since I have posted anything, but I promise, there are only good things coming.
We have been busy working on our bathroom, which comes with many, many stories, and many more trips to the hardware store (which will eventually cause me to lose my mind...). I am going to try to long on tonight from home with pictures of the progress.
Progress is sort of a loose term, as we are only complete with demo, priming & installing a light fixture.... oh how much slower it goes, especially when life gets in the way!
So, keep checking back, there will be progress photos soon!
Have a great day everyone!
We have been busy working on our bathroom, which comes with many, many stories, and many more trips to the hardware store (which will eventually cause me to lose my mind...). I am going to try to long on tonight from home with pictures of the progress.
Progress is sort of a loose term, as we are only complete with demo, priming & installing a light fixture.... oh how much slower it goes, especially when life gets in the way!
So, keep checking back, there will be progress photos soon!
Have a great day everyone!
Monday, April 11, 2011
Weekend Waste
Well, try as I may have done, a lovely new bookcase is NOT what you are seeing this morning. But there is a reason why. We had an ultimate project FAIL this weekend. It's not something that anyone ever wants to have happen, but it does happen. Read about our intention HERE.
This is the bookcase as it stood first thing Saturday Morning:


Anyways, I took off the shelves, dusted them, brought the bookcase downstairs and put it in the garage. My intention was to paint the bookcase, so I would have to go to Home Depot later to pick up paint. So we left for my dad's. In the afternoon, I had enough time to realize that the paint was not going to stick well to the melamine surface & that I should not attempt to paint it. Because we would be putting heavy books on it, the paint would stick to the books & peel right off later. So the goal was still to take the back faux-wood panel off, get some baskets and update the look of this shelving unit.
Off to the Depot we went. Unfortunately, there was no finished birch panel. The only thing that they had in 1/4" was Luan, which was red & didn't match. So we would have to buy an $11 panel of luan & cut it, we'd have to buy a $11 can of paint, and what color to you paint this if you aren't painting the unit??? We would have to buy screws.... so here we would be spending $30 to fix a 10 year old $35 bookshelf. It wasn't worth it.
So we went home, Matt and I reattached the faux-wood panel, I tried to glue the tear, knowing that books would be in front of it. We took it back upstairs, reassembled it, added two new baskets that I had found for $8.50 a piece, put the books back on the shelf and called it a day...

What a waste. Hours of work to unpack, dust, disassemble, reassemble & repack and the only thing that got done, was that the dust that had accumulated behind the unit was removed. I suppose our allergies are happy.
While next weekend is a busy one, I hope and hope that we can actually get something accomplished. Perhaps the trim and the walls, perhaps even getting a Kreg Jig & finishing our end table!!!
Have a great week everyone!
This is the bookcase as it stood first thing Saturday Morning:

I was so excited to get this done that I was determined to squeeze it in during our super busy weekend. First thing Saturday morning, before going to visit my dad, I unloaded the bookcase into the spare bedroom. As you can see the Dean Koontz pile is rivaled (and dominated) only by the Stephen King pile....


Anyways, I took off the shelves, dusted them, brought the bookcase downstairs and put it in the garage. My intention was to paint the bookcase, so I would have to go to Home Depot later to pick up paint. So we left for my dad's. In the afternoon, I had enough time to realize that the paint was not going to stick well to the melamine surface & that I should not attempt to paint it. Because we would be putting heavy books on it, the paint would stick to the books & peel right off later. So the goal was still to take the back faux-wood panel off, get some baskets and update the look of this shelving unit.
Sunday morning was incredibly busy, so when I got home Sunday afternoon, I immediately changed and went to the garage to tackle the bookcase. Three-quarters of the way through the panel removal, the bookcase began to sway. You have to be kidding me, this cardboard panel was actually giving this bookcase stability! It was necessary.
Well I had torn the backing a little bit taking it off the bookcase, so I didn't want to have to put it back on. I didn't want to add screws in the side, ruining the unit, so I thought, WAIT! We can run out and buy a 1/4" thick finish piece of birch. We can put it on the bottom half of the unit, where there is a fixed shelf, screw it in, and fix the stability problem.
Off to the Depot we went. Unfortunately, there was no finished birch panel. The only thing that they had in 1/4" was Luan, which was red & didn't match. So we would have to buy an $11 panel of luan & cut it, we'd have to buy a $11 can of paint, and what color to you paint this if you aren't painting the unit??? We would have to buy screws.... so here we would be spending $30 to fix a 10 year old $35 bookshelf. It wasn't worth it.
So we went home, Matt and I reattached the faux-wood panel, I tried to glue the tear, knowing that books would be in front of it. We took it back upstairs, reassembled it, added two new baskets that I had found for $8.50 a piece, put the books back on the shelf and called it a day...
What a waste. Hours of work to unpack, dust, disassemble, reassemble & repack and the only thing that got done, was that the dust that had accumulated behind the unit was removed. I suppose our allergies are happy.
While next weekend is a busy one, I hope and hope that we can actually get something accomplished. Perhaps the trim and the walls, perhaps even getting a Kreg Jig & finishing our end table!!!
Have a great week everyone!
Friday, April 8, 2011
Weekend Projects
I am itching SO badly to pull up our carpeting. Everywhere I have looked (or taken a quick peek in a corner) on the upper floor of our home, the floor looks like it's in decent condition. And I have to tell you, I'd rather have decent condition hard wood floors than gross old carpeting!
Our next few weekends are crazy busy, and it's probably not a good time to start the BIG bathroom renovation, as we really need one weekend, without interruption to get a good portion of it completed. But there are a few things around the house that I could get to this weekend, and with it slated to be a bit warmer, painting is not out of the question.
Our stairwell & upper hallway has been bright white primer since we moved in - and I can't wait to get rid of it. The trim will stay white, but the walls are going to be almost a wheat color. It will be two shades darker than our bathroom upstairs, but will tie in beautifully with the green & yellow palette of the downstairs colors.
With this project, could come another couple projects.
1. Rip up the carpet in the hallway up stairs. This is sort of a joke, as the hallway is barely 10' long, but it is a start, and might quench some of my "I need this carpet to be gone" feeling. I don't want to take the carpet up on the stairs, as the condition of stairs can be questionable, also I feel like wood stairs are a slipping hazard, so until we could do a cool runner with new carpet, that carpet will probably stay on the stairs...
2. Paint the hallway (as mentioned above) & start our photo wall. As I mentioned in a post here we would really like to put up a cool display wall in our stairwell. A quick paint job would give it a much more interesting backdrop to start with. A black and white display on the wheat colored wall would look striking.
 3. The bookshelf... At the dead end of our hallway, we have a bookshelf. It's an old target, maple color bookshelf with a "faux" back (one of those cardboard panels that is made to look like wood). I would like to pull off that panel to allow you to see through to the wall, and paint that bookshelf something. Maybe it's just white, maybe it's dark brown.... I also think that I might put it at a bit of an angle to give a new look to the hallway. Basically, it's another warm weather project, that could take place over a series of days & that could really change up the look of the hall. I would probably just use primer and spray paint on this unit, as it's just another melamine covered piece of furniture. Notice from the sketch that there is not a lot of room to hang artwork in the hallway, so we needed something of interest here & we needed somewhere to put our bookshelf.
The bookshelf is something I could easily do. Maybe I could just paint the trim in the hallway, to brighten that up a bit & do the wall painting next weekend. This will give me a little more time to look for & put together some type of photo gallery plan on the wall. Here's hoping that the weather stays warm & projects can get started again.
Soon I'll be taking on the front porch, so watch for that. The balustrade needs to be scraped, sanded and painted & I'd like to put a waterproof stain/paint on the floor to freshen up the look & protect the wood for a little longer. This will happen as soon as I can be sure that it won't go below 40 degrees at night!
Happy Friday everyone!
Our next few weekends are crazy busy, and it's probably not a good time to start the BIG bathroom renovation, as we really need one weekend, without interruption to get a good portion of it completed. But there are a few things around the house that I could get to this weekend, and with it slated to be a bit warmer, painting is not out of the question.
Our stairwell & upper hallway has been bright white primer since we moved in - and I can't wait to get rid of it. The trim will stay white, but the walls are going to be almost a wheat color. It will be two shades darker than our bathroom upstairs, but will tie in beautifully with the green & yellow palette of the downstairs colors.
With this project, could come another couple projects.
1. Rip up the carpet in the hallway up stairs. This is sort of a joke, as the hallway is barely 10' long, but it is a start, and might quench some of my "I need this carpet to be gone" feeling. I don't want to take the carpet up on the stairs, as the condition of stairs can be questionable, also I feel like wood stairs are a slipping hazard, so until we could do a cool runner with new carpet, that carpet will probably stay on the stairs...
2. Paint the hallway (as mentioned above) & start our photo wall. As I mentioned in a post here we would really like to put up a cool display wall in our stairwell. A quick paint job would give it a much more interesting backdrop to start with. A black and white display on the wheat colored wall would look striking.

The bookshelf is something I could easily do. Maybe I could just paint the trim in the hallway, to brighten that up a bit & do the wall painting next weekend. This will give me a little more time to look for & put together some type of photo gallery plan on the wall. Here's hoping that the weather stays warm & projects can get started again.
Soon I'll be taking on the front porch, so watch for that. The balustrade needs to be scraped, sanded and painted & I'd like to put a waterproof stain/paint on the floor to freshen up the look & protect the wood for a little longer. This will happen as soon as I can be sure that it won't go below 40 degrees at night!
Happy Friday everyone!
Tuesday, April 5, 2011
Wall Collage - Artwork
Something very popular in the decorating world right now is the wall collage. An area of wall, where instead of hanging just one item & focusing on that, you hang several items, that together become one functioning piece of art.
Some are very neat & organized:
And some are a little less so:
Some don't even use art, they just use the frames or even mirrors!
All VERY creative and very beautiful. If this is your style, it's easy to do & it can be really lovely. It allows you to hang up all the pictures that you never get to see as well as display other items. As I am a huge fan of hanging things on the wall, and freeing up space on floors, counters, tables, etc., this is a great place to add some of those items. If you are an artist yourself, have a bunch of cool sketches, frame them, add them into the mix. It's about displaying who you are on your wall.
There seem to be two schools of thought on how to really do this. One is to go monochromatic: All of the frames are the same color, similar matting, possibly even all black and white photos/ images. The other is to go quite the opposite. Mix and match colors, frames, patterns, etc.
There are two places in our home where I am considering doing something like this. And being that I tend to enjoy the more organized approach, I will probably go with that - similar spacing between items, lines carried through, all the goodies. However I tend to enjoy the eclectic mix of colors and patterns. Maybe all the frames are browns & creams - but they don't all have to be the same. It gives wiggle room!
Area One: Over the couch.
Our sofa in the living room is in front of the window. There is no other place for it to go! So there will be no wonderful piece of artwork over the sofa, however, there is a portion of wall over the end of the sofa that isn't asking for one big piece of off-centered art, it's asking for something unique. I think this is one area where we have an opportunity to experiment.
 I think that this wants to have one large piece to anchor it in place, but have several different pieces that make up the "whole". What that is exactly, I'm not sure, but I think it could be something like this. Possibly a large print - maybe with a letter, or something graphic. Next to it perhaps a few photos, or wall tiles, or anything really. Full of ideas, but nothing concrete yet.
Area Two: The staircase
Our stairwell tends to be a bit dark and boring. I think that this might be the perfect area to add a little something and fill the empty wall with some really great art. A lot of people tend to focus their art over the handrail, so people can view it as they walk up the stairs, however, I like having a display that can be viewed while you are on the first floor or on the stairs.
 My husband purchased a set of prints for me that are on canvas and that show a great scene from Italy. We have no really good place to put them, so I thought that this might be perfect. Put them in a shadow box, and use it as the anchor piece in the middle. The prints are black and white, so lets go with that. Black and white frames, tiles, items, etc. I don't know that we have 12-15 photos that we want to display right now, but as we grow as a family, we might! We can put prints, sketches, even patterned paper in a few of the frames for now, and the wall will grow, right along with our family.
The wall behind will be a dark sand color with white trim. And if we ever get to rip up the carpeting, there are lovely hardwood floors that will really make this area cozy.
So, we don't really have a plan, but we have an idea. This is something that will probably get pushed back into fall and winter, as the ability to get outdoor work & painting wanes with the weather. But I think that I love these displays. And if the interest goes away, it's nothing that some spackle and a coat of paint can't entirely erase.
What do you think of these "art walls"? Are you a fan?
Some are very neat & organized:
 |
| Photo Credit: Link |
 |
| Photo Credit: Link |
 |
| Photo Credit: Link |
All VERY creative and very beautiful. If this is your style, it's easy to do & it can be really lovely. It allows you to hang up all the pictures that you never get to see as well as display other items. As I am a huge fan of hanging things on the wall, and freeing up space on floors, counters, tables, etc., this is a great place to add some of those items. If you are an artist yourself, have a bunch of cool sketches, frame them, add them into the mix. It's about displaying who you are on your wall.
There seem to be two schools of thought on how to really do this. One is to go monochromatic: All of the frames are the same color, similar matting, possibly even all black and white photos/ images. The other is to go quite the opposite. Mix and match colors, frames, patterns, etc.
There are two places in our home where I am considering doing something like this. And being that I tend to enjoy the more organized approach, I will probably go with that - similar spacing between items, lines carried through, all the goodies. However I tend to enjoy the eclectic mix of colors and patterns. Maybe all the frames are browns & creams - but they don't all have to be the same. It gives wiggle room!
Area One: Over the couch.
Our sofa in the living room is in front of the window. There is no other place for it to go! So there will be no wonderful piece of artwork over the sofa, however, there is a portion of wall over the end of the sofa that isn't asking for one big piece of off-centered art, it's asking for something unique. I think this is one area where we have an opportunity to experiment.

Area Two: The staircase
Our stairwell tends to be a bit dark and boring. I think that this might be the perfect area to add a little something and fill the empty wall with some really great art. A lot of people tend to focus their art over the handrail, so people can view it as they walk up the stairs, however, I like having a display that can be viewed while you are on the first floor or on the stairs.

The wall behind will be a dark sand color with white trim. And if we ever get to rip up the carpeting, there are lovely hardwood floors that will really make this area cozy.
So, we don't really have a plan, but we have an idea. This is something that will probably get pushed back into fall and winter, as the ability to get outdoor work & painting wanes with the weather. But I think that I love these displays. And if the interest goes away, it's nothing that some spackle and a coat of paint can't entirely erase.
What do you think of these "art walls"? Are you a fan?
Subscribe to:
Posts (Atom)